Bold Color, Simple Tools: Exploring Squeegee Scrape Art

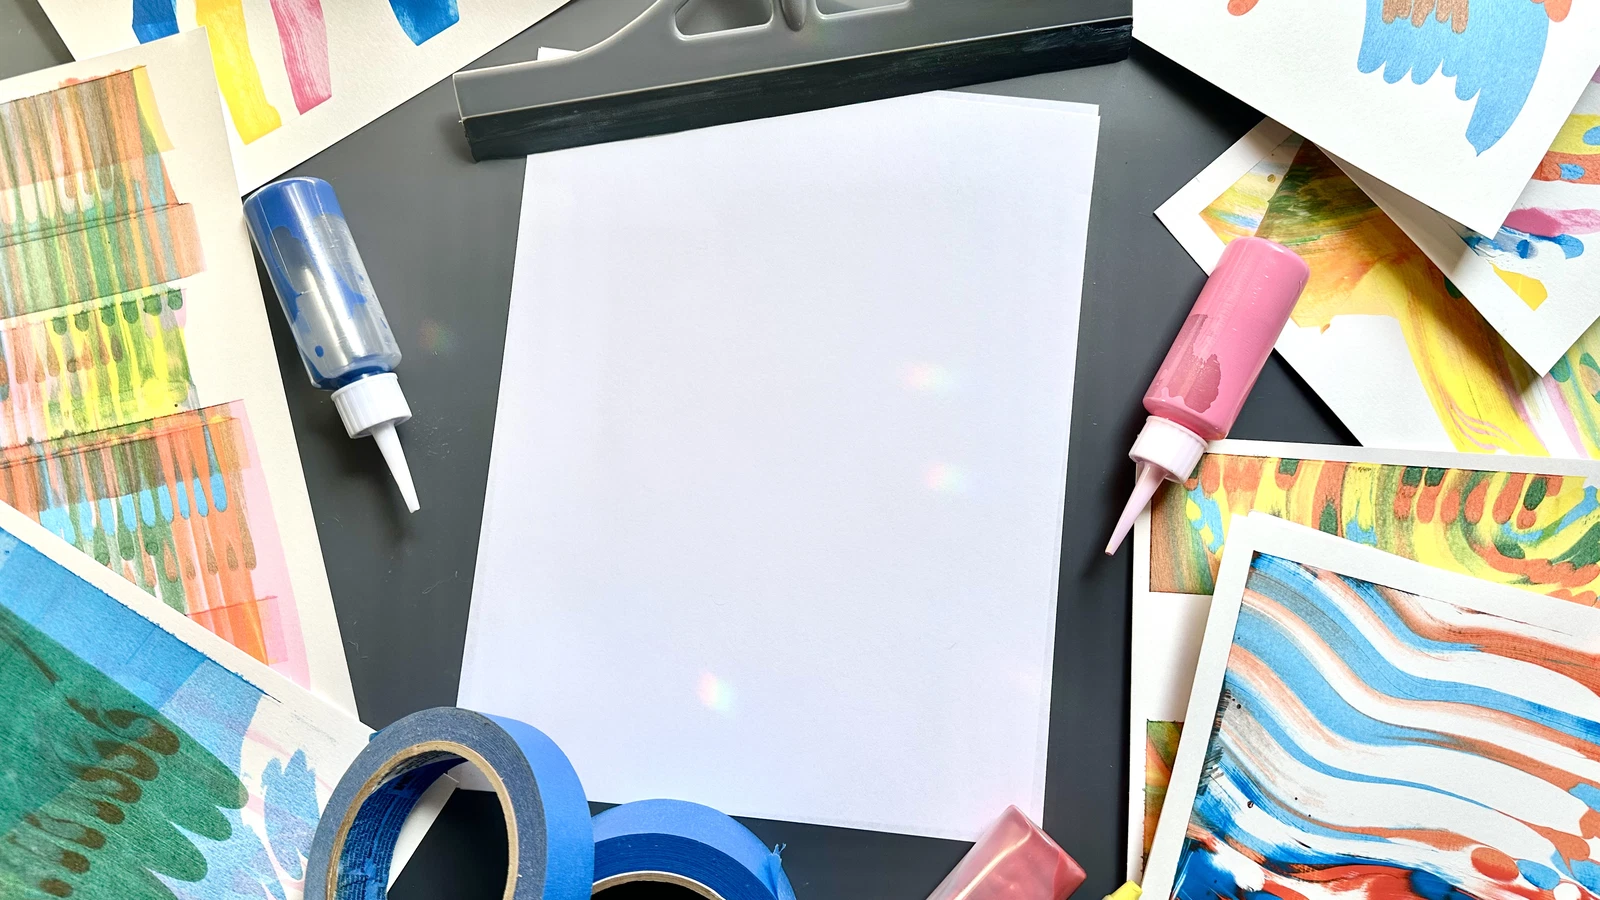
Have you ever wanted to create bold abstract art without needing fancy tools or years of training? Say hello to squeegee scrape art. A playful painting technique where you use a simple tool (in our case, a simple bathroom squeegee) to drag paint across paper; creating unpredictable swirls of color. It’s accessible, creative and easy to do. In fact, this style of painting only requires a few basic supplies to get started. You can even find most of the supplies you need at your local dollar store.
I love introducing this technique to beginners because there’s really no wrong way to do it. Even if you’ve never painted before, you can swipe on some colors and end up with a one-of-a-kind abstract masterpiece. It’s all about embracing the process and letting “happy accidents” happen (think of it like finger-painting for grown-ups!).
Materials
Here’s what you’ll need to make squeegee scrape art at home. Don’t worry you probably have many of these around the house and there are plenty of substitutions you can try:
-
Watercolor paper (heavy weight) – A thick, sturdy paper is best so it won’t buckle under wet paint. I recommend 140 lb watercolor paper or similarly heavy cardstock, which holds up beautifully to scraping paint. You can also use a canvas panel or even upcycle a piece of cardboard as your surface in a pinch.
-
Acrylic paints – Any acrylic paint will do (student-grade or craft acrylics from Dollar Tree are perfect for beginners). Pick a selection of 3-5 colors you love. It’s wise to include at least one light and one dark color for contrast. (Optional: If you only have kids’ tempera paint or even house paint, you can experiment with those, but acrylics tend to give the best results for scrape art due to their vivid pigments and ideal consistency.)
-
Bathroom squeegee – Yes, the kind you use to clean shower doors or windows! This will be our paint scraper. If you don’t have a squeegee, any flat, flexible scraping tool works too – for example, an old credit card, a plastic ruler or a palette knife can all do the job. (I’ve even seen artists use a piece of cardboard or a spatula – use what you got.)
-
Painter’s tape (masking tape) – Optional but super handy. Use a few pieces of tape to secure your paper to your work surface. This keeps the paper from sliding and can create a clean border on your finished piece if you tape off the edges. Less movement means better control when you scrape.
-
Palette or paper plate – Optional. You actually don’t need a palette for this project since you’ll be applying paint directly to the paper. However, a disposable plate or tray is useful if you want to mix a custom color or two, or just to rest your squeegee on a non-messy surface.
-
Drop cloth or newspaper – Lay this down to protect your table or floor. Scrape painting isn’t as messy as some painting techniques (we’re not flicking paint around), but a little paint might go off the edges of the paper. An old newspaper, plastic sheet or even a trash bag cut open works great as a table cover.
-
Apron or old clothes – Wear something you don’t mind getting paint on, just in case. Acrylic paint can stain clothing once it dries. (Roll up your sleeves and maybe have a spare rag for your hands, too!)
-
Paper towels or rag – Keep these on hand for quick clean-ups. You’ll use them to wipe the squeegee clean between swipes and to blot any excess paint or spills. A damp paper towel is perfect for cleaning the squeegee edge during the project.
Instructions
Now for the fun part, making your squeegee scrape art! Follow these step-by-step instructions. Remember, the process is meant to be loose and experimental, so don’t stress about perfection.
-
Set up your workspace: Protect your area by covering the table with your drop cloth or newspapers. Tape down the edges of your watercolor paper onto the table (one strip of tape on each side works well). This will keep the paper flat and prevent it from moving. (If you want a white border around your finished art, you can tape off a border on the paper itself too.) Make sure your paints, squeegee, and paper towels are within arm’s reach.
-
Apply your paint dots/lines: Take your acrylic paints and squeeze out small blobs or lines of paint along one edge of your paper. I suggest starting at the top edge of the paper for your first try. It’s easiest to pull the paint downward from top to bottom for beginners. Place a row of paint blobs about an inch from the top edge. You can make 5-6 quarter-sized dots of paint, or even little streaks or zig-zags of paint. Feel free to alternate colors in a pattern or randomly; for example, try blue, then yellow, then blue again, etc. Keep in mind that the order of the colors will somewhat influence the result (adjacent colors will mix as you scrape). Tip: Less is more to start. You can always add more paint in the next step if needed, but if you put huge gobs of every color at once, you might end up with a muddy mix. So start with modest amounts of a few colors.
-
Scrape the paint with the squeegee: Now the exciting part! Hold your squeegee firmly with both hands. Place it just above the line of paint blobs at the top of the paper, and drag it downwards in one steady motion, pulling the paint with it. Apply even, gentle pressure as you scrape. You will see the colors smear and mix in a beautiful, unpredictable way beneath the squeegee. Try to drag it all the way to the bottom of the paper if you can. (It’s okay if you get some paint on the tape or drop cloth beneath, that’s why we prepped the area.) As you scrape, you’ll notice how the colors blend: a slow, steady pull with consistent pressure will create smooth blends, while a faster or more uneven swipe might leave more streaks or distinct lines of color. There’s no exact science here, so feel free to experiment with different speeds and pressure. If you like, you can even try a second scrape in a slightly different direction. For instance, you might pull the squeegee at a slight diagonal to create a subtle wave in the pattern. (Just be aware that additional passes will mix the colors more.) Take a moment to appreciate the cool pattern you just made with one simple motion!
-
Add more color (if needed): After your first scrape, evaluate your piece. Do you see a lot of blank white areas you’d like to fill? Do you want to add a punch of a new color? If yes, you can add more paint and scrape again. This time, try dropping a couple of new blobs of paint in any area that looks sparse or along the edges where you want more color. Then pull the squeegee across that section again. You can continue in the same top-to-bottom direction, or try pulling from another side for a layered effect. Just use caution with layering wet paint: scraping over too many times while everything is still wet will blend the colors completely (which could give a brownish tone if you mix a lot of different colors). One strategy is to let the first layer of paint dry a bit before adding more on top. Acrylics dry pretty quickly – within a few minutes for thin layers. If you’re impatient, use a hairdryer on a low/cool setting to speed up the drying of the first layer. Once the base is dry to the touch, you can apply a second round of paint on top and scrape again, and the new colors will ride over the dried layer instead of mixing in. This can create a cool layered look where streaks of different colors overlap without blending into mud. You can repeat this process of adding and scraping as many times as you like. (Just know that paper can only hold so much paint after a few layers it might get saturated, so stop before things get too goopy.)
-
Finishing touches: When you’re happy with the way your painting looks, it’s time to call it done! Knowing when to stop is probably the hardest part. It’s so fun to keep tweaking but often, simple is better with abstract art. Carefully remove the tape from your paper (if you used any) to reveal clean edges. Pull the tape off slowly, at a 45° angle, to avoid tearing the paper. Set your artwork aside to dry completely on a flat surface. Thick paint areas might take an hour or more to dry; you’ll know it’s fully dry when the surface is no longer cool to the touch. While it dries, take a moment to admire your creation. Every scrape art piece will have its own unique look celebrate the cool color blends and textures you achieved! Once dry, you can sign your work on the back or corner if you like. You DID that!
Tips & Troubleshooting
Before you run off to make another one (warning: this can be addictive), here are some tips and fixes to help you get the best results:
-
Color choice matters: If you throw every color of the rainbow together at once, you might end up with a brown muddy spot where they all mix. To avoid this, start with a limited color palette that you know will look good blended. Colors next to each other on the color wheel (like blue + green + yellow) tend to mix into pretty results, whereas colors opposite each other (like orange and blue, or purple and yellow) will mix into brown or gray if over-blended. You can absolutely use bold contrasting colors in the same piece, just be mindful to not scrape them over each other too many times. Another trick: if you want to use a lot of different colors, try doing them in separate sections or layers so they don’t all mix together at once.
-
Wipe the squeegee between swipes: One of the biggest keys to avoid muddiness is cleaning your tool. After each scrape, you’ll notice a bunch of paint on the edge of your squeegee. If you go for another pass without cleaning it, you’ll drag that residual paint back onto the paper and mix it into the next colors. Keep a paper towel or rag handy and give the squeegee a quick wipe after each pull. This keeps your colors crisp and prevents unplanned mixing. * Bonus: wiping the tool also prevents getting big blobs on your page from paint accumulating on the squeegee’s corners.
-
Layering colors for depth: As mentioned, you can definitely do multiple rounds of scraping to layer colors. The key is to let layers dry so they don’t completely blend. If your first layer is looking good and you want to add a new color on top, wait until that base is dry, then add your new paint and scrape. You’ll get a second layer of streaks on top of the first, it can look really awesome, almost like a 3D effect of colors. If you’re impatient like me, use a hairdryer to speed things up between layers. Also, try layering with metallic paints (like a gold or silver scrape on top of a colorful background) for a cool shine the results are beautiful.
-
Avoiding muddiness: “Muddy” colors happen when you mix too many hues together, resulting in a dull brown/gray tone. To avoid this, try not to overscrape the same area. Usually one or two passes with the squeegee is enough to cover the paper. If you keep going back and forth over and over, all the distinct colors will merge into one. If you notice the colors starting to look murky, it’s a good sign to stop and let it dry, or add fresh paint on a new layer as described above. Also, remember to clean that squeegee! (I know I just said it, but it’s worth repeating because it makes a big difference.)
-
Try a test swipe first (optional): If you’re a little nervous, take a scrap piece of paper and do a mini test. Put a small dot or two of paint and scrape a tiny section, just to get a feel for how much pressure to use. This isn’t required at all, but some people find it boosts confidence before committing to the “real” piece. That said, don’t worry too much – this technique is very forgiving. Sometimes the best approach is to just go for it on your actual paper and treat it as an experiment.
-
Experiment with different tools: A standard flat squeegee will give you broad, smooth strokes of color… but what if you used something with a pattern or a different size? Feel free to try other scraping tools to see what effects you get. For example, a piece of corrugated cardboard (with those ridges) used as a scraper will leave subtle striped lines in the paint. A notched cake decorating scraper (if you have one for baking) could create wave patterns. Even an old comb could make a cool texture by dragging it through the paint. There’s no harm in playing around once you get the basic technique down, each tool will give a new look, and you might discover a favorite new method.
-
Keep paper towels handy for fixes: If you ever end up with too much paint in one spot (say you got a gigantic blob that didn’t spread), you can gently blot it with a wadded paper towel. This will lift some paint off the paper. Then you can either leave that area lighter or add a different color and scrape again. Also, if paint drips off the edge of the paper, just wipe it from the table before it dries. (Acrylic cleans up with water while wet, but is harder to remove once dry.)
-
Embrace the process: Finally, remember that scrape art is abstract. There’s no right or wrong outcome, and often the beauty is in those unexpected blends and textures. If your first try isn’t what you envisioned, that’s okay! Set it aside, grab a new sheet, and try again. Every piece will teach you something new maybe you’ll like how the colors turned out in one section, or you’ll decide to use a bit less paint next time, etc. It’s all part of the learning. The more you experiment, the more you’ll get a feel for how the paint behaves. So keep a playful mindset and enjoy the ride.
What to Do with Your Finished Scrape Art
One of the great things about this project (besides the fun you have making it) is that you end up with a beautiful piece of abstract art! Here are some ideas for using or displaying your scrape art once it’s dry:
-
Frame it: This art can look surprisingly sophisticated when framed. Trim the edges of the paper if needed, then pop it into a frame. You can use a ready-made frame from a store (8x10 and 5x7 are common sizes for smaller pieces use a mat board for a professional touch). Hang it on your wall or stand it on a shelf. Instant DIY home décor! Abstract pieces like this also make great gifts who wouldn’t love a piece of cheerful art made just for them?
-
Make cards or tags: Cut your painted paper into smaller pieces to create unique greeting cards, note cards, or gift tags. For example, you can cut a 2-inch strip of your art and glue it onto the front of a blank folded card as a colorful accent. Or punch out shapes (like hearts or circles) from the painted paper and attach them to plain gift tags. It’s a lovely way to share your art in a practical use.
-
Scan or photograph it: If you really love your design, consider scanning it or taking a high-res photo. Once it’s digitized, the sky’s the limit you could print it on canvas, turn it into a phone wallpaper, make prints for friends, or even use sections of it in digital collages. (I’ve seen people print their art onto things like tote bags and mugs as keepsakes!) Scanning your art also means you have a copy even if you decide to cut up or give away the original.
-
Use it in a collage or journal: Scrape art papers make awesome background material for collages, vision boards, or art journals. You can cut or tear pieces and combine them with photographs, magazine clippings, or drawings to create a larger mixed-media piece. Because the scrape art has abstract color and texture, it can complement many themes. Tip: If you have bits of painted paper trimmed off from framing, save them for future collage elements or even as funky bookmarks.
-
Decorate objects: Think outside the frame your acrylic scrape art can be used to cover all sorts of things. For instance, you could wrap a sturdy piece around a pencil cup or notebook cover and secure it (use decoupage glue or clear adhesive). Or cut the paper to fit the top of a jewelry box and seal it on as a custom decorative lid. Essentially, treat your artwork as a decorative paper. Just remember to seal it with a clear varnish or Mod Podge if you want it to be durable on functional items.
-
Inspire others (or yourself): Display your work where you can see it and be reminded of your creative accomplishment. Maybe pin it on a bulletin board or clip it to a string as part of a rotating gallery of your creations. And definitely share a picture with friends or on social media if you’re comfortable it might inspire someone else to try scrape painting too. Plus, if you make a whole bunch of these, you’ll have a nice record of your experiments to look back on. Sometimes I even cut a piece into smaller rectangles and make a mini series of artworks to send to friends. Get creative with it!
Rheal Talk
Every time I do a scrape art project, I’m reminded of why I fell in love with this technique in the first place. Confession time: I was inspired to try scrape art after seeing a mesmerizing video on my tiktok/insta of an artist dragged a window squeegee down a canvas, pulling a rainbow of paint with it and I was instantly hooked. As a maker, I’m always exploring new ways to play with color and this looked so satisfying. In fact using a squeegee to push paint around oddly reminded me of frosting a cake; that smooth swipe and blend of colors (except this time, the mess was on paper, not in the kitchen). It was pure creative joy without any pressure to make it “perfect.”
In my day-to-day work, I often work with materials like concrete and glass, which require a bit more precision and patience. Scrape painting has become a refreshing break from that. It’s fast, free-form and all about experimentation. Whenever I feel stuck in a creative rut, I’ll set up a quick scrape art session for myself. It always surprises me and gets the creative juices flowing again. I’ve also started sharing this activity in some of my workshops and it’s always a hit. I love watching people’s faces light up when they pull the squeegee for the first time and reveal a burst of colors. Each person’s piece comes out so different, yet all of them are beautiful in their own way. It really reinforces that idea that there is no wrong way to make art. Some of my workshop attendees have even said it’s almost therapeutic to just swipe paint around and see what happens, and I wholeheartedly agree.
If this at-home tutorial has sparked your curiosity, I hope you give scrape art a try (and try it again and again!). It’s an art form that anyone can enjoy, regardless of experience. And who knows maybe one day we’ll get to scrape paint side by side in an in-person class or open studio session. I’m already dreaming up ideas for a future scrape art workshop because I think it would be amazing to see a whole room of people exploring this technique together. Until then, keep experimenting on your own. Spread those colors, embrace the surprises, and most importantly, have fun with it. Happy scraping, and I can’t wait to see what you create!